
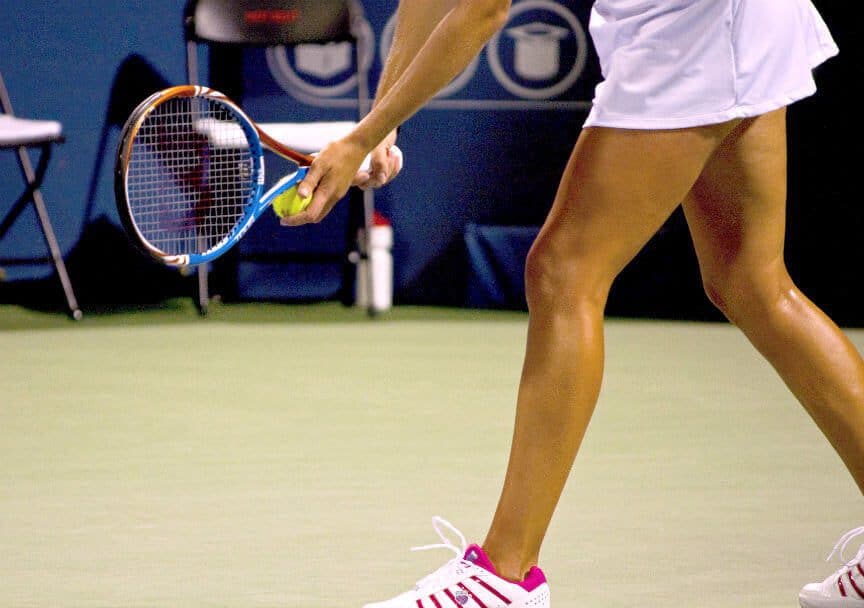
When beginners first grip a tennis racket, the natural tendency is to hold the handle in a tight grip with the thumb wrapped around the index finger. Another common mistake is to place the index finger behind the grip, pointed toward the head of the racket. This is not only ineffective in that it diminishes power on the stroke, but can also lead to injury.
A proper tennis grip should feel firm but not tight, similar to a firm handshake. Your fingers should end up in an angled position along the handle. A V-shape should form between the thumb and index finger. At the bottom of the handle, the pinky through middle finger should be close together. The index finger should be separated and in a trigger-like position.
While grip preferences vary from individual to individual, these aspects of the tennis grip are fairly consistent among all players. We will cover the various types of grips used in the game in more detail. But first, let’s start with the basic setup.
Setting Up the Racket Grip
When players are first taught to hold a racket, there are usually two ways this is done.
The first is to place the racket on the ground and then simply pick it up, adjusting the fingers around the handle to secure the grip.
This results in a semi-western tennis grip, a grip used primarily for baseline forehand strokes, the natural formation of the V-shape between the thumb and the index finger with fingers angled along the handle and the index finger in a trigger position.
One problem with this approach, in particular for beginners, is that the semi-western grip can sometimes be difficult to get used to when first starting out. Additionally, this approach requires the extra adjustment of the fingers around the grip.
The Handshake Grip Method
The second method is to hold the racket with your non-dominant hand (i.e., the left hand for right-handed players) in front of you with the head of the racket perpendicular to the ground and then extend a handshake to the handle.
When wrapping your hand around the grip, rotate your palm so it is slightly upward. This will ensure that you end up with an eastern grip rather than something between a continental and eastern grip.
This is a more intuitive approach. The resultant eastern tennis grip is much easier for beginners to work with. It doesn’t require as much adjustment between the forehand and backhand.
While the ability to put forehand topspin on the ball is somewhat sacrificed, the flexibility and more importantly, the natural feel of the tennis grip technique is advantageous for starting players.
Finger Positioning
With this grip, the fingers will be angled along the handle. A V-shape between the thumb and index finger will be created. The pinky and ring fingers will be joined together, the middle finger will be slightly separated. The index finger will be most separated in the trigger position.
A few things to note here. The trigger position of the index finger is important as it allows for greater control and leverage when hitting groundstrokes, volleys and serves. It’s important not to wrap the thumb around the index finger as this will hinder its ability to do its job.
Instead, the thumb should make contact with the middle finger. This will free up the index finger so it can form the trigger position needed for greater control of the racket.
In this position, the index finger and thumb will grasp the racket handle with the inside knuckles pressed firmly against the grip in order to allow adjusting the position of the head of the racket.
If done correctly, you should be able to hold the racket with just the index finger and thumb in that position. It is a firm grip that allows for great control.
This differs from the more passive and flat position of the pinky, ring finger, and middle finger. These fingers, of course, help better clasp the racket handle and provide added stability. But they are less involved in the pivoting motion of the racket, which is used throughout the game.
Racket Handle Bevels
Racket handles are shaped as an octagon. They are made up of eight bevels, the flat surfaces that comprise the octagon shape. When gripping a racket, these bevels are referenced to describe where the hand is placed.
The bevels of a racket can vary somewhat from manufacturer to manufacturer. While there are always eight in total, the shape can vary slightly. Keep this in mind when picking out a new racket. The feel of the grip may be different than your current racket despite being the same size.
The eight bevels can be referenced by their position or using a numerical system. There are the top and bottom bevels, the right and left bevels and the four bevels in between.
The numbering system works clockwise so that the top bevel is 1, the bevel immediately next to it is 2, the right bevel is 3, and so forth up to the 8th bevel which is immediately left of the top bevel.
This numbering system assumes a right-handed player. For left-handed players, the numbering works in a similar fashion but in a counter-clockwise direction.
Grip Positioning
There are various ways to describe grip positioning. Probably the most common is to determine on which bevel the index finger knuckle and the heel pad of the palm are placed.
An easier way to describe the placement of the grip is to reference the edges of bevels and align the V-shape that forms between your thumb and index finger. This is the method we will be using in this article.
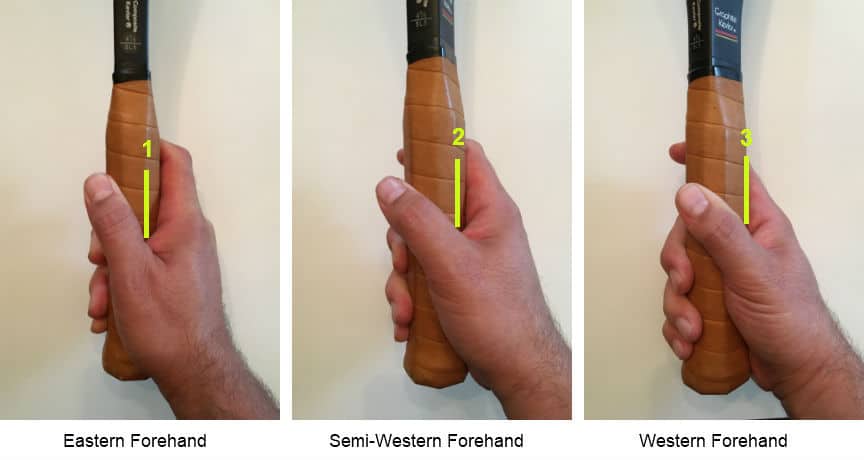
As you can see in the image below, the eastern tennis grip is formed when the V-shape between the thumb and index finger is aligned with the right edge of the top bevel (position 1 in the illustration below).
Moving clockwise to the right edge of the next bevel, we arrive at the semi-western forehand grip (position 2 in the illustration below). The western forehand grip (position 3 in the illustration below) is created along the next bevel, the bottom edge of the right-hand bevel.
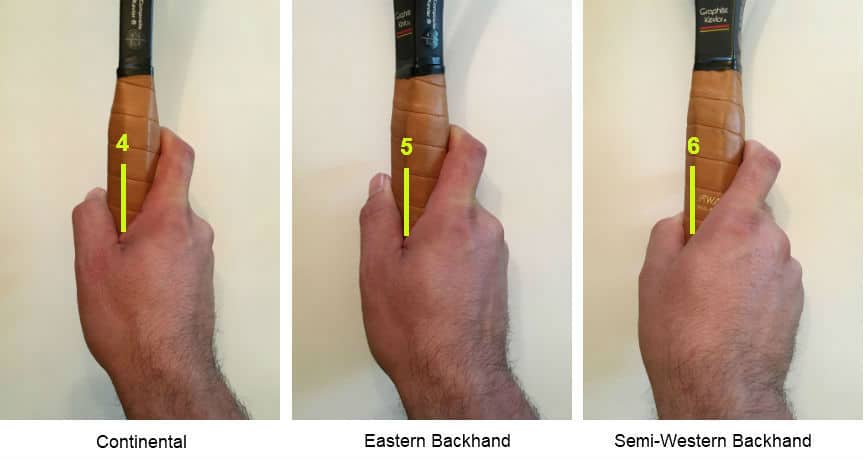
For the backhand, the system is in reverse. We begin with the continental tennis grip (position 4 in the illustration below) as the starting point and work counter-clockwise towards the eastern backhand (position 5 in the illustration below) and semi-western backhand (position 6 in the illustration below) grips respectively.
At this point, you may be wondering which grip to use for each stroke. As mentioned previously, grips can vary based on individual player preferences. However, here are some general guidelines that may help you decide which to use when.
Forehand Grips
Backhand Grips
 Eastern Forehand Grip
Using the continental grip as a starting reference point and working clockwise to position 1 in the illustration above, the eastern forehand grip is used primarily for forehand shots, including lobs, and volleys.
It is versatile enough that it could be used for other strokes as well. However, it is best suited for forehand shots and volleys. This is a grip that beginners can more easily pick up when developing their game.
The advantages of the eastern grip are its versatility, stability, power, and ease of use. It can produce a lot of power on relatively flat shots but is also versatile enough that it can be used to produce adequate topspin on forehands.
The disadvantage of the eastern forehand is that it cant produce as much topspin as some of the more extreme grips such as the semi-western or western forehand grips. It requires a more vertical upswing to produce topspin.
Of course, the reason that it generates less spin is that it is more geared towards power. All in all, the eastern forehand grip offers a balance between power and spin, but with a bias towards greater power.
Semi-Western Forehand Grip
Rotating further clockwise to position 3 in the illustration above, the semi-western forehand grip (position 2 in the illustration above) is used primarily for baseline forehand strokes. It can also be used for topspin lob shots and for quick short angle shots.
The semi-western forehand grip has gained great popularity in recent years. Many of those who use this grip enjoy the added topspin it can generate, something that is more prominent in the modern game.
The advantage of this grip is that it generates a greater amount of topspin on the ball, while at the same time not sacrificing too much power. It’s a middle ground between power and topspin.
The disadvantage is that it produces less power than the eastern forehand grip. It can also be more difficult for beginners to pick up. Nonetheless, it offers a good balance between topspin and power, with a bias towards topspin.
Western Forehand Grip
By further rotating the grip clockwise to the next bevel edge, we arrive at the western grip (position 3 in the illustration above). This is the most extreme forehand grip used in tennis. When holding the racket in a western grip position, the palm of the hand is directed up to the sky.
This is a more extreme grip used by advanced players to generate large amounts of topspin on their forehand shots. Because it is more extreme, however, it is very difficult for beginners to pick up.
The only real advantage to the western forehand grip is the amount of spin it is able to generate. Those who are able to master the grip tend to have heavy amounts of topspin on their forehands.
While the grip adds greater spin, it sacrifices power to a significant extent. What’s more, this grip position greatly distorts the natural motion of the arm and causes added stress on the muscles.
The Continental Grip
The continental grip is essentially the workhorse of grips. It can be used for just about any stroke, with the exception of the forehand. At one point in time, it was used for forehand strokes as well, but as the game has evolved that is no longer the case.
Starting with the V-shape formed between your thumb and index finger in the 4 position (see illustration above), the continental grip is used for serves, volleys, overheads, slices and defensive shots.
These shots make up a large part of the game. The backhand can be played using the continental grip for underspin shots, slices, and even topspin, though most players prefer the eastern backhand grip for topspin shots.
The advantages of the continental grip are its versatility, ease of use – it’s fairly easily learned by beginners, power, and stability. Shots taken using the grip feel solid.
The disadvantage of the grip, at least on the backhand, is that it limits topspin to an extent. For this reason, most players use the eastern backhand instead. The grip also produces a more flat, albeit powerful, shot on groundstrokes.
Eastern Backhand Grip
For backhand grips, start with the continental grip at position 4 (see illustration above). Work counter-clockwise until you arrive at the next bevel edge immediately to the left (position 5 in the illustration above). This is the eastern backhand grip, used for backhands and spin serves and kick serves.
The eastern backhand grip also allows for easy transitioning into a volley. The eastern backhand grip is one of the more commonly used grips for the backhand. The grip is fairly easy for beginners to pick up.
The grip is relatively versatile, though its primary purpose is for topspin backhands. It offers a reasonable balance between power and spin. This is the primary reason for using it. It is also fairly natural on the arm.
The disadvantages to this grip are few. It doesn’t generate as much power as the continental grip on the backhand. At the same time, it doesn’t offer the heavy amount of topspin that the semi-western grip does.
Semi-Western Backhand Grip
As you continue rotating counter-clockwise, the semi-western backhand grip (position 6 in the illustration above) is one bevel further over and is used primarily to generate the greatest amount of topspin on the backhand.
Much like the western forehand grip, this is a more extreme and advanced grip. Beginners will generally want to avoid it initially, at least until they’ve fully developed their backhand stroke.
The advantages should be immediately apparent. This grip is meant to provide extreme amounts of topspin on the backhand. That is essentially its one and only purpose.
The disadvantages are that it is not a very versatile grip. It also sacrifices power to a great extent. Like the western forehand, it is not a very natural motion and puts a fair amount of stress on the arm muscles.
Two-Handed Backhand Grip
Finally, the two-handed backhand grip is a combination of the continental backhand grip position for the dominant hand and the semi-western grip for the non-dominant hand placed above it.
A more extreme variation on this is a combination of the eastern grip on the dominant hand with the semi-western grip on the non-dominant hand. As you might imagine, this variation produces greater topspin.
The two-handed backhand grip has become very popular in recent years. It helps provide extra power on shoulder level shots and offers added control on returns. This is the primary reason it has gained in popularity.
While the grip offers great power, the stroke is less flexible. Underspin is difficult to generate with a two-handed backhand. Low shots are very difficult, if nearly impossible to reach.
For this reason, players alternate between using one hand and two hands. On power shots at shoulder height, they will use the two-handed backhand. On low shots or slices, they will switch to the one-handed backhand.
Switching Your Grips
While you could simply alternate between a continental and eastern tennis grip for almost all of your shots when starting out, as you progress as a player you will likely find that you want to further adjust the grip.
By holding the racket in front of you in between shots while in the ready position – facing your opponent with feet separated and knees slightly bent – making the adjustment will be easy and natural once you get used to it.
This is particularly helpful when switching between a forehand and a backhand shot or when switching between a baseline shot and playing a volley up at the net. When serving, the adjustment is easier since there is no time pressure to switch.
How Many Grip Types Do You Need?
The number of grips may seem overwhelming and even intimidating for beginners. However, it’s not necessary to use all of them. It may, in fact, be best to stick to a couple of grips when starting out.
While an advanced player may alternate between four or more types of grips in a single match, beginning players are better served sticking to the basic grips such as the eastern forehand and backhand grip for topspin shots and the continental grip for low shots, slices and serves.
As you progress you will find that you naturally want to explore the more extreme grips for added topspin. Allow the transition to a more extreme grip to happen over time, rather than trying to force something that feels unnatural from the onset.
Share this Post